If you love warm bread fresh from the oven (with butter melting on top) as much as we do you'll find tons more homemade bread recipes here.
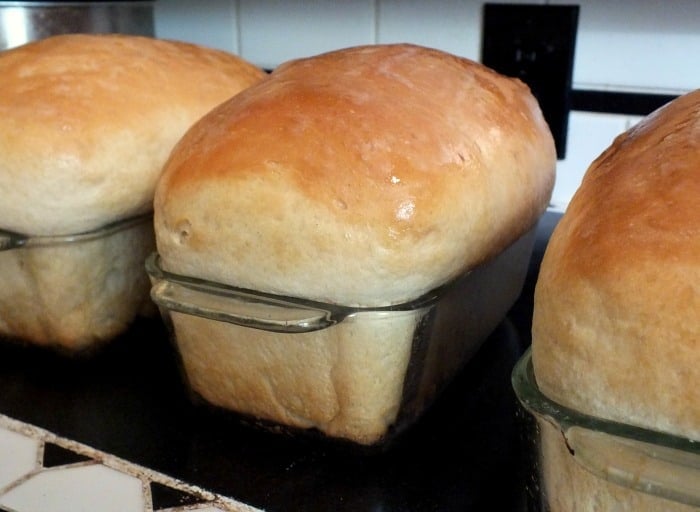
Table of Contents
❤️ Why you'll love it
- There's nothing like the taste (and smell!) of homemade bread!
- Over 900 5 star reviews plus lots of rave reviews on Pinterest and Facebook.
- This easy bread recipe has been in the top 3 on Google since I published it in 2008!
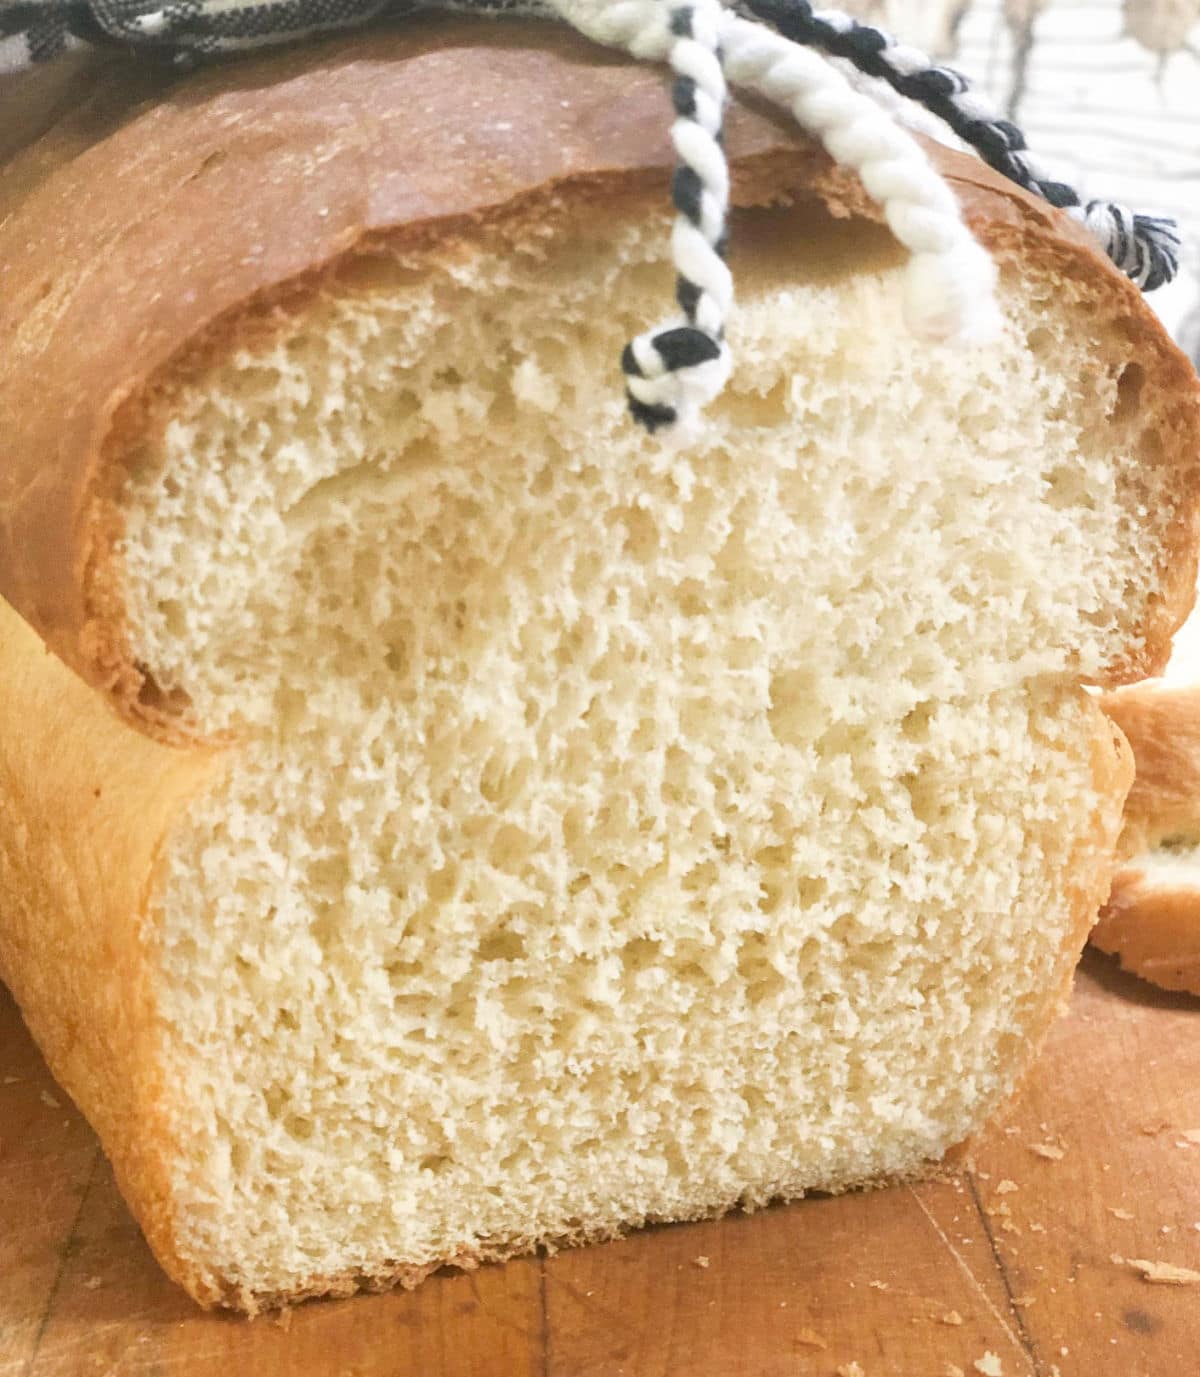
This truly is a no fail buttermilk bread recipe - millions of readers have tried it and loved it because it comes out delicious, light and fluffy every time!
If you've never worked with homemade yeast dough before take a look at this breadmaking guide before you get started. It answers about any question you could have.
⭐ Readers say
⭐⭐⭐⭐⭐ Definitely 5 Stars Thank You for posting these awesome recipes. Having you with your background and experience post for all of us who are always looking to find a better way of preparing delicious food is remarkable!! I personally want to Thank You for your kindness and thoughtfulness!💕💕💕. Debra A.
⭐⭐⭐⭐⭐ Just made this for the first time, I have never made bread like this. I was worried because the buttermilk mixture was so fluffy but this bread turned out AMAZING! Such a good flavor! It’s subtly sweet and has great texture. Thanks for the recipe! Stacy
🧾 Ingredients
This is an overview of the ingredients. You'll find the full measurements and instructions in the green recipe card (printable) at the bottom of the page.
Honey buttermilk bread is so unbelievably light that no one will believe it's made from scratch.
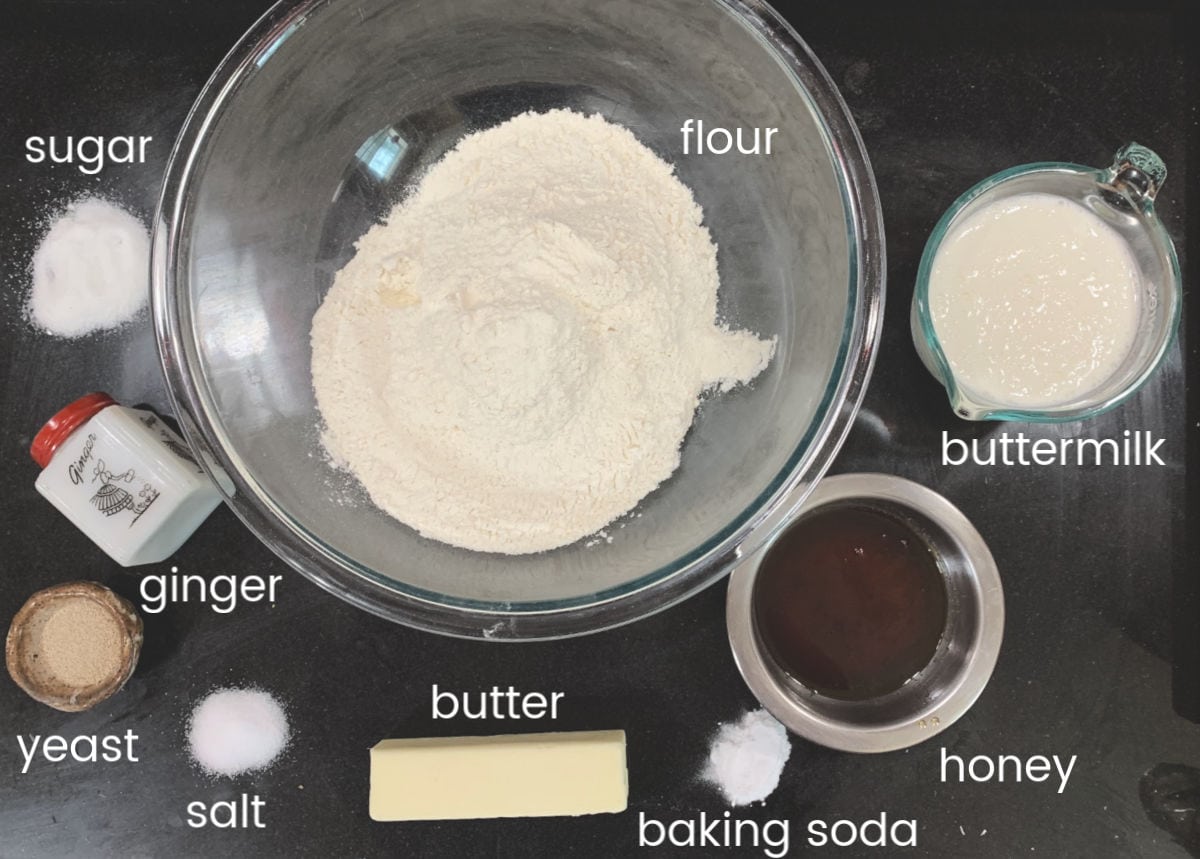
Here are the ingredients for this soft sandwich bread.- I used active dry yeast but you can use rapid rise if you want - just follow the instructions on the packet of yeast.
- Buttermilk in bread adds a little flavor but mostly it creates that soft, tender crumb we all love. If you don't have any you can read this article on how to make buttermilk.
- Salt - kosher salt was used. If you use regular table salt cut the amount by about ¼th or so.
- Bread flour - you can use all purpose flour if you like. There might be a tiny difference in how high it rises. Take a look at this list of different types of flour and how to use them.
🔪 Instructions
This is an overview of the instructions. Full instructions are in the green recipe card at the bottom of the page.
Just follow the images to see how to mix, knead, and shape this easy, homemade sandwich loaf.
Mixing and kneading
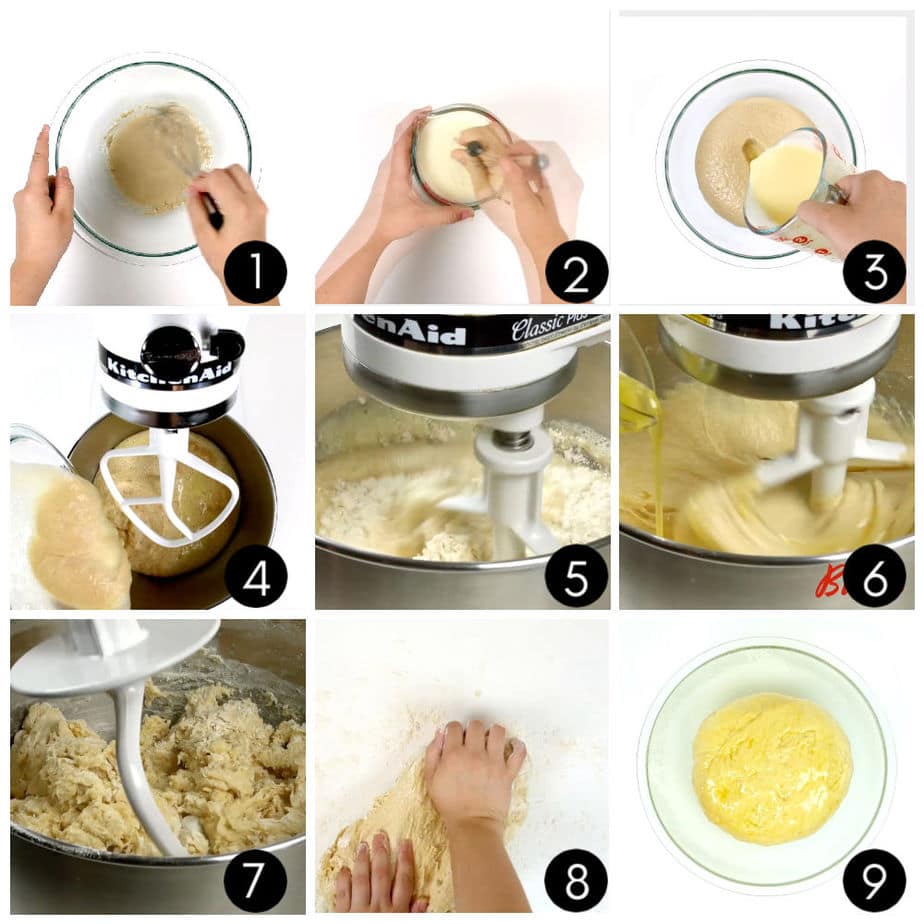
- Mix the sugar, ginger, yeast, and warm water in a small bowl and set aside until foamy.
- Whisk the buttermilk, honey, salt, and baking soda together in a large bowl.
- Add it to the yeast mixture.
- Pour into the bowl of a stand mixer.
- Add three cups of flour and mix until smooth, about 3 to 5 minutes on low speed of a stand mixer.
- Pour in the butter and blend.
- Switch to kneading hook (dough hook attachment). Add the rest of the flour, one cup at a time, keeping mixer on low speed.
- When buttermilk dough pulls from the sides of the bowl remove it from the mixer to a lightly floured work surface. Knead it by hand a few times until elastic and smooth
- Place dough in greased
mixing bowl , turn to grease the top, and cover with a clean tea towel. Let rise about 1 ½ hours.
Shaping
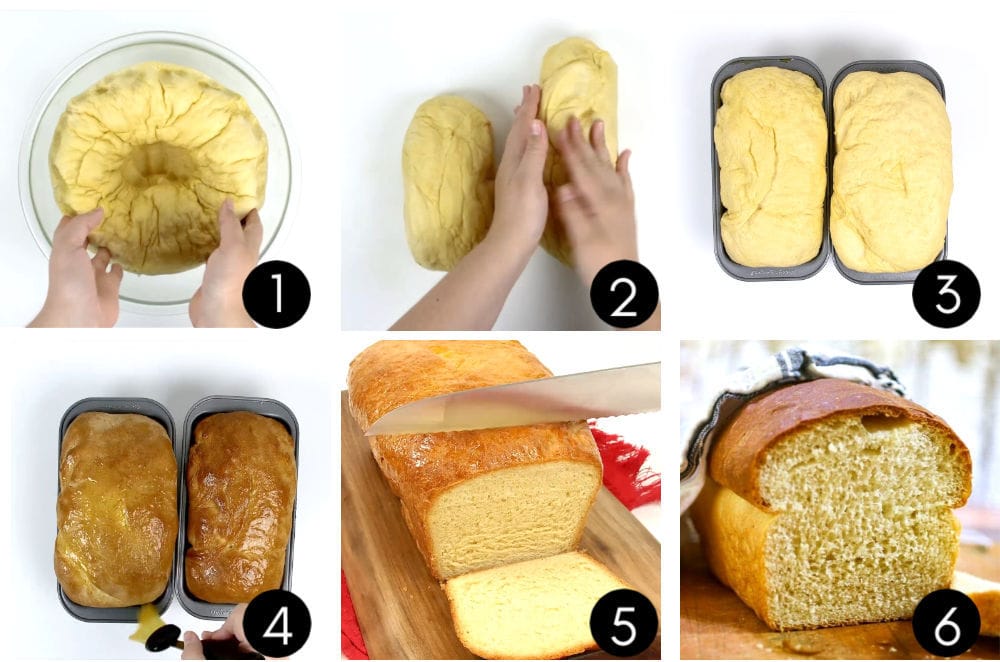
How to shape homemade sandwich bread step by step.- Punch dough down. You'll want to give it a gentle kneading for a minute or two but nothing like the first time! Don't over-knead it.
- Shape into loaves.
- Place loaves in bread pans and let rise until double. Bake.
- Remove finished loaves from oven. Brush with butter.
- Cool on a wire rack and slice.
- Perfect!
🍞 Bread machine instructions
Many of you have asked how to make buttermilk bread in a bread machine. One reader, Debbie, did and this is what she said:
"If you want to make it and bake it in a bread machine cut the buttermilk bread recipe in half, set it on white bread setting, and add ingredients in this order (or according to your manufacturer's instructions):
- Water
- Buttermilk
- Butter
- Honey
- Sugar
- Salt
- Flour mixed with ginger and baking soda
- Yeast
🎥 Video
Click on the image to watch me knead this. (Video opens in a new tab).
🥫 Storage
Homemade bread doesn't last long after it's baked. You can wrap it tightly in plastic wrap or place in an airtight storage container and keep it at room temperature for about 2 days.
For longer storage cool completely, wrap tightly in plastic wrap, then aluminum foil, and freeze for up to 3 months.
I like to cut it in slices and freeze with a piece of wax paper or parchment paper between the slices. That way I can just thaw what I need without thawing the whole loaf.
To freeze unbaked dough you'll want to double the amount of yeast called for in the recipe and then freeze the dough after shaping it into loaves.
When ready to bake let the loaves thaw overnight in the refrigerator then finish rising at room temperature. It will take a bit longer to rise than normal.
Bake as directed in the recipe.
📖 Variations
This is one of those easy bread recipes that you can change up by adding other ingredients.
- Knead in raisins and add sugar and cinnamon before shaping for a wonderful cinnamon raisin bread - use shaping instructions in this cinnamon swirl bread recipe.
- The rich texture of buttermilk bread makes it perfect for slicing thickly and making into French toast.
- If it gets a bit stale make it into bread pudding. Yum!
- This makes a great buttermilk dinner rolls recipe, too! Just shape into rolls and bake at 375f for 10 to 15 minutes.
💭 Things to know
Expert tip: You may need more or less flour than called for in the recipe. Weather and climate can affect your ingredients - humidity will often mean you'll need at least an extra ¼ cup or so of flour. If you bake bread on a rainy day it will rise higher than on a clear one due to air pressure!
- Make sure all ingredients are at room temperature.
- Use yeast that is within the sell by date. If your bread dough isn't rising well it could be that the yeast is too old.
- If you're short on time you can let the bread rise in the refrigerator overnight for either the first or second rising time.
- The baking soda does two things… It works with the acid in the buttermilk to help the bread rise high and light and balances any off tastes from the acids in the buttermilk.
- Make sure your liquids are not hotter than 110F. Check with an insta-read thermometer. If the liquids are too hot the yeast will die.
- Be sure to fully knead the dough. It develops the flavor and texture - and will take 8 to 10 minutes by hand of kneading vigorously.
- Grease the top of the dough before rising.
- Let dough rise in a warm spot. A draft-free place is best.
- If you like the crust a darker golden brown brush it with egg yolk mixed with a teaspoon of water just before putting in the oven.
- Cool the baked bread in the pan for 10 minutes then turn out to finish cooling.
- Brush the loaves with butter while still hot and then cover with a clean tea towel while cooling for soft crusts.
- Here's how to use up that leftover buttermilk!
Troubleshooting
If you're having problems with yeast doughs and homemade bread I have answers!
Also - these tips on getting your homemade bread to rise properly are what keep mine high and light!
👩🍳 FAQs
Yes! This bread recipe is made with honey but you can use sugar in it instead. Use an equal amount or slightly less sugar.
My favorite is glass.
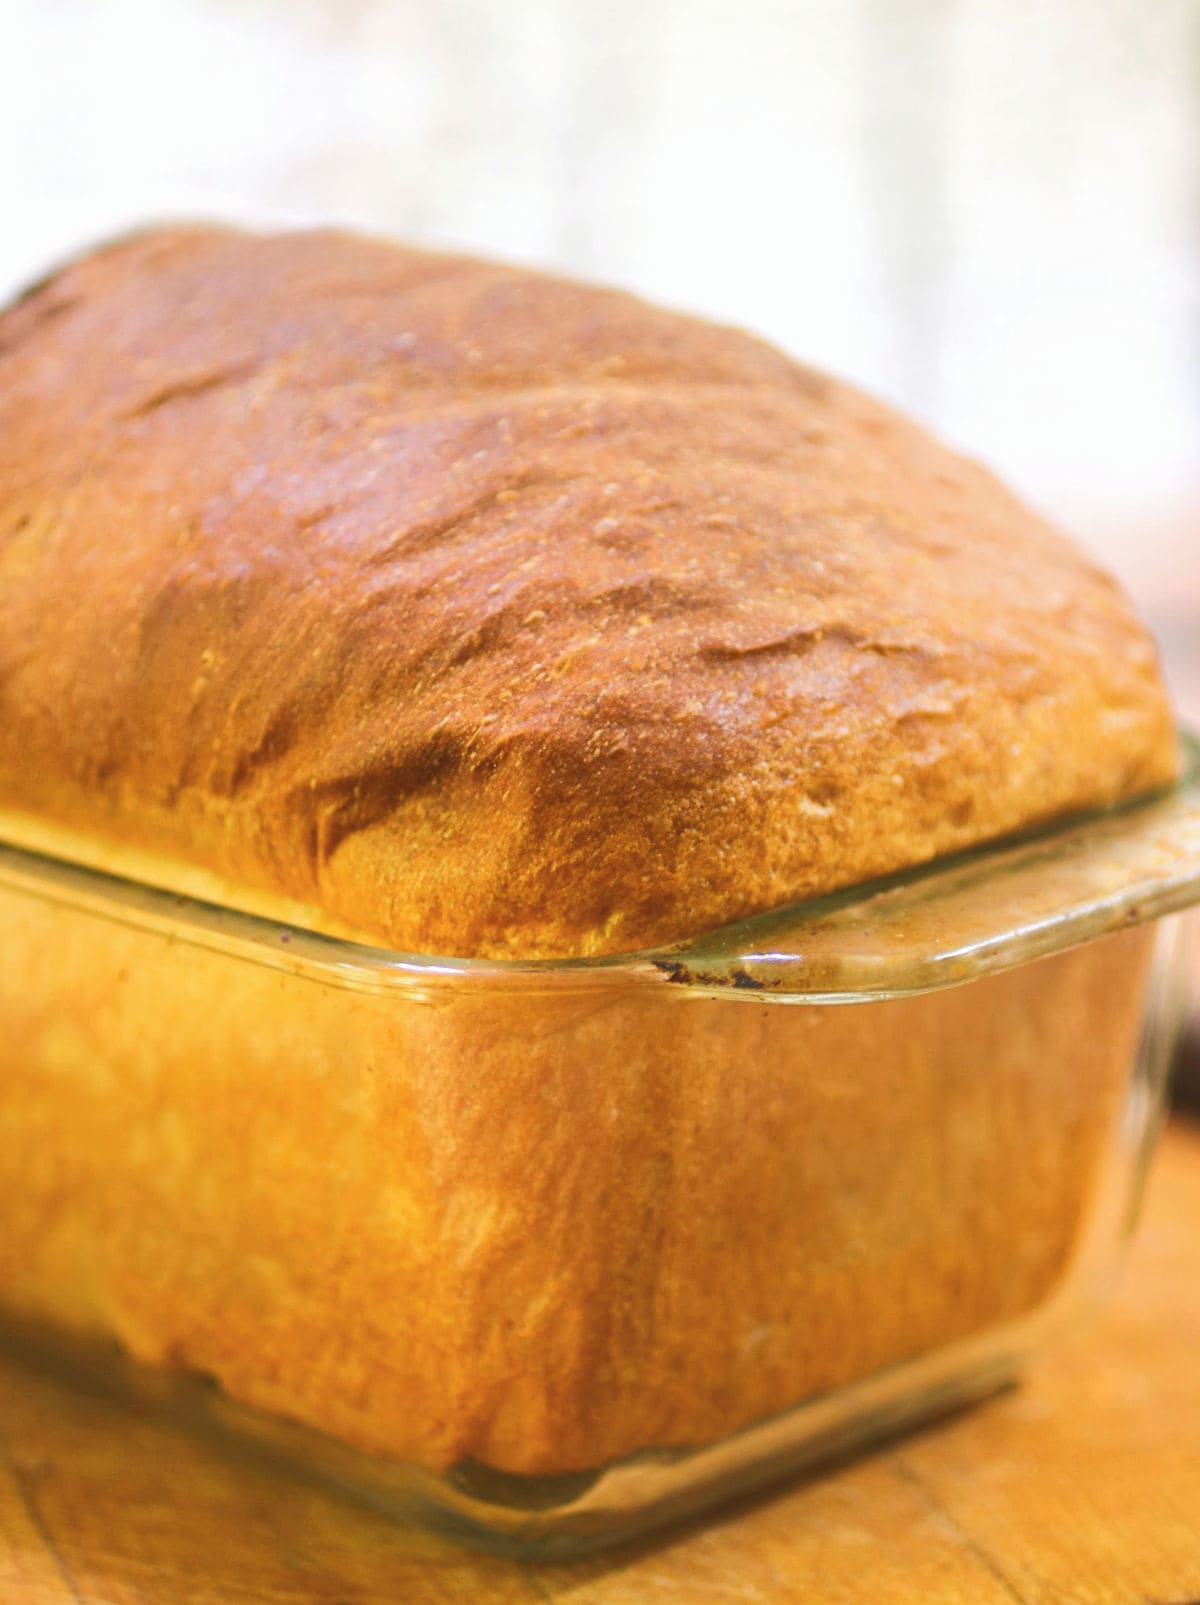
The loaves bake evenly and the crust is perfect. I've heard good things about cast iron but I haven't tried it yet. Aluminum or metal pans are fine if that's what you have - your crust may brown faster so watch it.
Rub the crusts with butter and cover with a tea towel as soon as you bring them out of the oven if you like soft crust.
If you want a crusty bread don't cover it as it's cooling. You can also brush it with egg white blended with 1 teaspoon of water before baking.
You can use an insta-read thermometer if you like. Push it into the side of the loaf - the center of the bread should be about 200F.
You can also turn the loaf out and tap the bottom. It will sound hollow. After you've baked bread a few times you'll just know.
Try removing a tablespoon of flour and adding a tablespoon of wheat gluten for every cup of flour you add to the bread. This helps it rise better and stay light and fluffy.
Sure, you'll need to halve the recipe and follow the manufacturer's instructions. Be careful not to overknead.
📚 Related recipes
🍽️ Serve with...
This bread makes delicious sandwiches! Try it with -
📞 The last word
This country white bread is a classic recipe that you'll use again and again!
If you click on the number of servings in the recipe card you can adjust the measurements up or down for the exact number of servings you need. Don't forget that you can click on "add to collection" to save it to your own, private recipe box!
If you love this recipe please give it 5 stars! ⭐️⭐️⭐️⭐️⭐️
📖 Recipe
Honey Buttermilk Bread
Print Pin Recipe Save Recipe Rate RecipeIngredients
- 1 tablespoon yeast, or 1 packet
- 1 pinch powdered ginger
- 1 teaspoon sugar
- ¼ cup water, warm, 105F - 110F
- 2 cups cultured buttermilk, warm, 105F - 110F
- ⅓ cup honey
- 1 teaspoon kosher salt, if using table salt use ¾ teaspoon
- ¾ teaspoon baking soda
- 6 cups bread flour, you may use all-purpose flour
- ¼ cup butter, melted and cooled so that it is warm to the touch but not hot.
Instructions
- In a medium sized bowl mix the yeast, ginger, sugar, and 110F water.
- Set aside for 5 minutes or until foamy.
- Whisk the buttermilk, honey, salt, and baking soda together and add it to the yeast mixture.
- Add three cups of flour and mix until smooth, about 3 to 5 minutes on low of a stand mixer.
- Pour in the butter until it is totally mixed into the batter.
- Add the rest of the flour, one cup at a time, keeping mixer on low speed.
- When dough pulls from the sides of the bowl remove it from the mixer to a lightly floured surface. Knead until elastic and smooth. You can also knead in your mixer according to manufacturer's directions.
- Place in greased bowl, turn to grease the top, and cover bowl with a clean tea towel.
- Allow the dough to rise for 1 ½ hours, or until double.
- Punch down and form into two loaves. Place each in a greased loaf pan with seam sides down. Grease tops.
- Cover, and allow to rise in a warm place for 45 minutes, or until it is just about to the tops of the bread pans.
- Preheat oven to 375F.
- Bake for 30 minutes. You can cover the tops with foil if they brown too fast.
- Remove from oven and brush top of the loaves with melted butter. Place on cooling rack.
- Allow to cool in pans for 10 minutes.
- Gently run a knife around the edge between the bread and the pan to loosen it.
- Turn out and cool completely on a rack.
- Cover the loaves if you want soft crusts.
Notes
-
Expert tip: You may need more or less flour than called for in the recipe. Weather and climate can affect your ingredients - humidity will often mean you'll need at least an extra ¼ cup or so of flour. If you bake bread on a rainy day it will rise higher than on a clear one due to air pressure!
- Make sure all ingredients are at room temperature.
- Use yeast that is within the sell by date. If your bread dough isn't rising well it could be that the yeast is too old..
- Make sure your liquids are not more than 110F. Check with a insta-read thermometer. If the liquids are too hot the yeast will die.
- Be sure to fully knead the dough. It develops the flavor and texture - and will take 8 to 10 minutes by hand.
- Grease the top of the dough before rising.
- Let the dough rise in a warm spot.
- If you feel the bread gets too brown at 375f bake at 350 f.
- Cool the baked bread in the pan for 10 minutes then turn out to finish cooling.
- Brush the loaves with butter while still hot and then cover with a clean tea towel while cooling for soft crusts.
Nutrition Facts
Nutrition information is estimated as a courtesy. If using for medical purposes, please verify information using your own nutritional calculator. Percent Daily Values are based on a 2000 calorie diet.
This recipe has been tested several times. If you choose to use other ingredients, or change the technique in some way, the results may not be the same.
This recipe has been undated from the original 2008 version to improve reader experience. Last updated June 26, 2022 for more information and better instructions.













David Ervin says
Just made Buttermilk Honey Bread but I added some
Sourdough srarter, WOW, turned out Great!! Best rise, and such a great taste!! Thank you. Now have your book too!! I see a lot of baking in my future!!
George says
My wife is so amazed at me. Your bread recipes are so easy to follow. I am on the good list for now thank you. This bread tastes amazing!!!
Kavita says
Ridiculously good. I made it without the ginger. It was a huge hit. Made the dough, allowed it to rise for an hour and then put it away in the refrigerator till evening. Wanted to bake it for dinner. Took it out two hours before baking, got it to room temp, shaped it, allowed it to rise,for an hour,baked. Hey presto warm bread for dinner.
Hope Williams says
Love love love it!! Just searched my history for this recipe because I didn’t bookmark it when I made it. This will be the only recipe we use from now on. I had no problems with it browning, and didn’t have to/ will not make changes to the recipe.
Thank you for an amazing recipe!!
Tricia says
Hello! I just wanted to start off by saying that you absolutely inspire me. Thank you for sharing your time and talent to make the world a better, more-homeade-bread-filled place 🙂 I do have one question that may sound a bit funny: would you say the dough yielded in this recipe would be approximately 2 pounds? I collect vintage Pyrex, and recently came across a baking tube at a yard sale. I love baking homemade bread my loaf pan, but the thought of cylindrical loaves and circular slices intriguies me! The tube says to use a 1lb-1.5lb batch of dough, and before I whipped out my (not always so reliable) kitchen scale, I figured I would ask the professional! Thank you again, hope you’re having a wonderful 2019!
Penny says
Very forgiving recipe! I made a few errors like the buttermilk was too cold, the kitchen wasn't very warm, perhaps over-kneaded it with my Kitchenaid...and it still turned out well. I did the second rising in quite a warm oven and it seemed to work! I like that the bread is substantial but not heavy. Thanks for sharing this recipe and your goldmine of information!!
Misty Melton says
This is an outstanding bread recipe. I am in the process of making this for the 2nd time.
I did not have to use foil. I baked it on the 2nd rack from the bottom. I baked one in a glazed ceramic loaf pan, and the other in non-stick metal and both turned out great.
The last time I made it, I froze one loaf after it cooled and when I was ready for it I just popped it back in the oven at 375 again until it was heated thoroughly.
Thanks so much for the recipe.
Tammy says
Everything you make, Marye is outstanding! Love your recipes!
Barb says
Can I use half whole wheat flour or cracked wheat flour in this recipe?
Tania says
I’ll definitely make this again.
Best bread I made so far, very soft and delicious
Misty says
I just ate my second slice, right out of the oven.
This is a great bread recipe. I followed the recipe to a T. I mixed it in my Kitchen Aid mixer using a dough hook for the full mixing process. I used Busy Bee Honey, so nothing too strong. I LOVE honey, but my husband doesn't care for it so I didn't want it to overpower the bread.
I'll definitely make this again. I plan on slicing it up tomorrow for grilled cheese and bacon sandwiches.
Laura says
I also have been making bread for about 40 years. I had left over buttermilk and fresh honey from an orchard so am making this right now. I love to knead by hand. It reminds me of watching my Busia make bread when I was very little. Thanks for the recipe.
Matthew Cox says
So for the buttermilk is it just the liquid left over from churning heavy cream into butter? Or do I need to culture it? Going to give this a shot this weekend.
Ann says
I’ve made this three times in two weeks! So yummy! Would it be possible to do half the flour with whole wheat?
Marye Audet says
Yes! I've done that. Just add an extra tablespoon of gluten flour.
Sherry says
Add a bit of potato starch or zanthum gum to the AP flour.
Cheryl says
I recently tried this recipe with gluten free flour. Wasn’t as light and fluffy as I wanted. Any suggestions?
Marye Audet says
Unfortunately it's the gluten that makes the bread rise and stay fluffy. There's really no way to substitute it in this recipe;
Meghan says
I think all bread makers have a favorite recipe and I was no different until this past week. My go-to, no-fail white bread recipe just wasn't turning out good loaves. My ingredients are fresh and nothing changed. They just wouldn't bake properly no matter what I tried. So I took to Pinterest having already decided I wanted to find a buttermilk bread recipe (I'm blaming hormones).
I am SO GLAD I chose this one. I have two glorious loaves of amazing bread. Well, one-and-a-half. They haven't cooled completely and we've already polished off half a loaf. The rest may not make it through the night.
My loaves are pretty dark because the foil would not stay put but they are still soft thanks to butter and bees wrap, and perfectly done inside. Thank you so much for saving me this week. I think I'll be keeping this as my go-to bread for quite a while!
Larry says
I have had this recipe stored for quite awhile but have never gotten around to making it. Well, today was the day. Rainy and stuck inside, perfect bread making weather. I wanted to use my bread machine and was hoping it would work. I cut the recipe in half and only used the dough cycle. I took it out of the machine, kneaded it and let it rise again for 45 minutes. It is absolutely the best bread I have ever had. I have another slice on a plate right now next to my chair. Thank you so much.
JoAnn says
Hello Larry. I was reading your comment about using a bread machine for this recipe. You took it out and still had to knead your dough? I was thinking about buying a machine for the kneading part of this recipe. Have arthritis in both my hands and was looking for a pain free solution. Will a bread machine do this as well? Thank you for your time...JoAnn
Brenda says
Thank you for this recipe. It is the BEST BREAD EVER!!
Your tips regarding ginger and other bread enhancers are terrific, plus your recipe for homemade buttermilk. Do you have a gluten free version - so that I can bake it for my friends that are on a gluten free diet.
Many thanks for such a great website full of practical and delicious recipes.
Donna says
Sorry! Just saw to go by your mixers kneading instructions.
Donna says
If kneading with a Kitchen aid mixer, for how long and at what speed?